 Isometric View
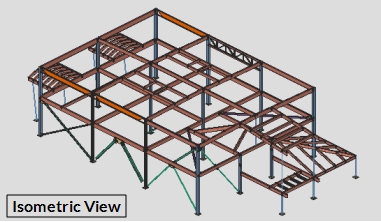
Shows you an isometric perspective of your current view. You are given rotation options.
- Step-By-Step
- Tips and Tricks
- Related Tools
1 . Click the Isometric View icon, which is pictured above. The icon can be found on the Layout page > Navigate section.
Alternative: Invoke Isometric View using the Find Tool by searching the command name and clicking the icon, which is pictured above.
Learn more about alternative methods for launching commands.
2 . The view in your model changes and Accept - Options - Return mouse bindings become active. Optionally use the mouse wheel to rotate the angle of the isometric view around the global Z axis of the model. Left-click (Accept) when you are ready to set the isometric view.
Note: At this point you have not actually created a new view; you have simply changed your current view in Modeling. Use Save View As to save a complete isometric view or Save Area to save a partial isometric view.
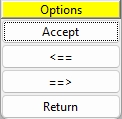
Alternative 1: Middle-click (Options) to disable the mouse bindings and open the Select an option window. Click the <== or ==> buttons to rotate the angle of the isometric view. Click the Accept button when you are ready to set the isometric view. Click the Return button to cancel the command.
Alternative 2: Press Esc or right-click (Return) to cancel the command.
- Current view location (changed by Isometric View)
- Save View As (to save a complete section view)
- Save Area (to save a partial plan view)
- Undo View Change (to undo Isometric View)
- Revert (undoes a series of view change operations)
- Detail Erection Views (to create 2D drawing of the iso view)
- Rotate View (alternative to Isometric View) .
- Depth checking (controls visibility in and out of the reference elevation)

